在 Rails 中果要實作 tag 的功能,目前網路上找到比較常見的做法是使用 act as taggable on 這個 gem,不過這個 gem 似乎沒有維護的很好?於是參考了網路上的做法,自己在 Rail 上實作做了一個簡單的 tag 功能,本篇的範例實作以下項目:
- 每篇文章(post)可以加上多個標籤(tag)
- 編輯文章時,輸入不存在的 tag name,可以自動產生該 tag。
- 利用 select 2 這個 JavaScript 函式庫,來實作 tag 輸入欄位的前端美化及 auto complete 功能。
事前準備
本範例使用以下 gem
- bootstrap 4 (包含 jquery-rails)
- simple form for
- font awesome rails
接下來是文章的部分,其實就是很簡單的 CRUD,這裡就不特別說明。
新增Post model:
$ rails g model post title:string content:text
$ rails db:migrate新增Post controller:
class PostsController < ApplicationController
before_action :set_post, only: %i[edit update show destroy]
def index
@posts = Post.all
end
def show
end
def new
@post = Post.new
end
def create
@post = Post.new(post_params)
if @post.save
redirect_to post_path(@post)
else
render :new
end
end
def edit
end
def update
if @post.update(post_params)
redirect_to post_path(@post)
else
render :edit
end
end
def destroy
@post.destroy
redirect_to root_path
end
private
def post_params
params.require(:post).permit(:title,:content)
end
def set_post
@post = Post.find_by(id: params[:id])
redirect_to root_path if @post.nil?
end
end[postscontroller.rb]
view 的部分可參考 github
新增 Tag model 和關聯
新增 Tag Model:
$ rails g model tag name:string
$ rails db:migrate新增 Tagging Model:
Tag 本身和 Post 是多對多的關係,一篇文章會有多個標籤,一個標籤有可能會有多篇文章,因此必須在新增一個 tagging model,設定多對多關聯:
$ rails g model tagging tag:belongs_to post:belongs_to
$ rails db:migrate接著新增 Tag 和 Post 間的關聯:
class Post < ApplicationRecord
has_many :taggings
has_many :tags, through: :taggings
end[post.rb]
class Tag < ApplicationRecord
has_many :taggings
has_many :posts, through: :taggings
end[tag.rb]
class Tagging < ApplicationRecord
belongs_to :tag
belongs_to :post
end[tagging.rb]
基本款: 在 post 上可以新增 tag
接下來實作如何在 post 上新增多個標籤。基本款就是在標籤的欄位讓使用者輸入文字,然後用 , 去分隔標籤的字串( 例如輸入 books, sports, tv 就代表新增三個標籤)。
首先在 _form.html.erb 這個文章輸入表單模板內,加上一個 tag_list 的欄位:
<!-- ...略 -->
<%= f.input :tag_list %>
<%= f.button :submit ,class: "btn-outline-primary"%>
<% end %>
</div>
</div>[form.html.erb]
接著處理 post controller 中的 Strong Parameters:
class PostsController < ApplicationController
# ...
def post_params
params.require(:post).permit(:title,:content,:tag_list)
end
# ...
end[posts_controller.rb]
但是 Post 中並沒有 tag_list 這個屬性,跟它關聯的 Tag 也沒有,這樣我們怎麼將這個字串變成 tag 呢?
其實當我們在 controller 中使用 post.new(post_params) 或 post.update(post_params) 的時候,會先去呼叫 post 中每個屬性的 setter:
post.title = post_params[:title]
post.content = post_params[:content]
post.tag_list = post_params[:tag_list]從這裡我們就就可以動手腳,自己在 post 中新增 tag_list 的 setter:
class Post < ApplicationRecord
# ...
def tag_list=(names)
self.tags = names.split(',').map do |item|
Tag.where(name: item.strip).first_or_create!
end
end
end[post.rb]
此外可以另外加上一些擴充功能,例如使用 tag 來找文章、加上 tag_list 的 getter 來字串化關聯的 tag 物件:
class Post < ApplicationRecord
has_many :taggings
has_many :tags, through: :taggings
# 可以用 Post.tagge_with(tagname) 來找到文章
def self.tagged_with(name)
Tag.find_by!(name: name).posts
end
# 如果要取用 tag_list,可以加上這個 getter
def tag_list
tags.map(&:name).join(', ')
end
# tag_list 的 setter
def tag_list=(names)
self.tags = names.split(',').map do |item|
Tag.where(name: item.strip).first_or_create!
end
end
end[post.rb]
這樣就算完成了基本款的標籤功能,在 post#new 及 post#edit 中就可以新增 tag
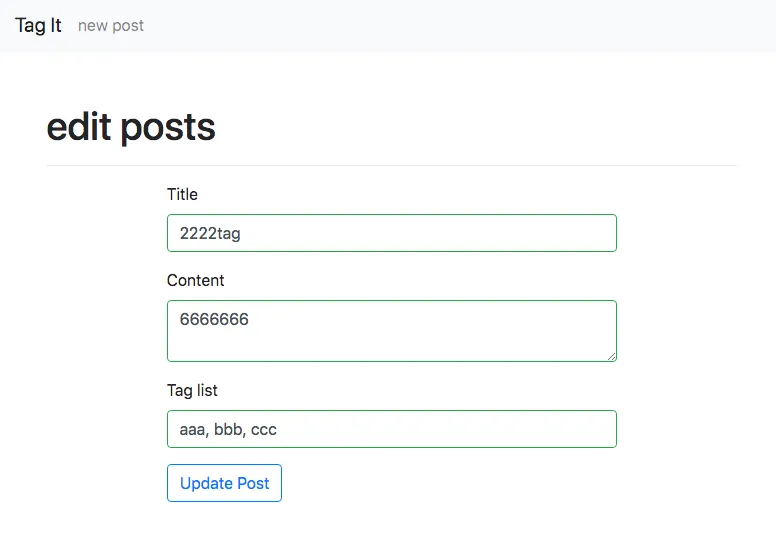
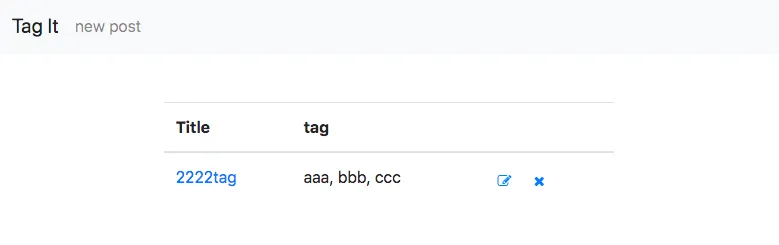
另外如果在 view 中使用 post.tag_list 就可以取出所有關聯標籤的字串,結果如下
[commit: add tag method]
[commit: add tag on post#new post#edit and show tags]
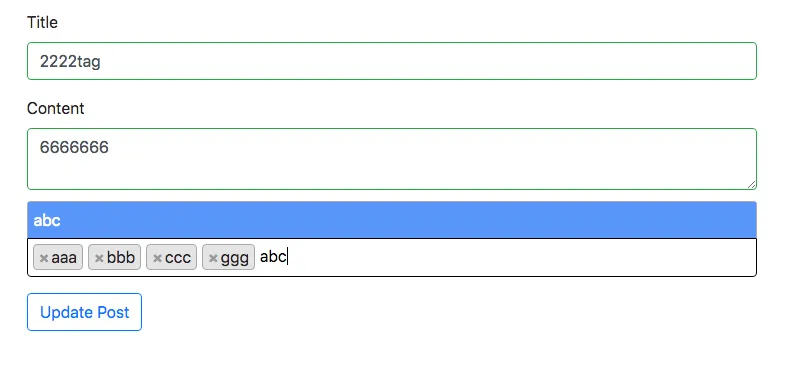
進階款:使用 select 2 來優化 UI
select 2 是一款 jQuery 的套件,有一些好用的選單功能可以用
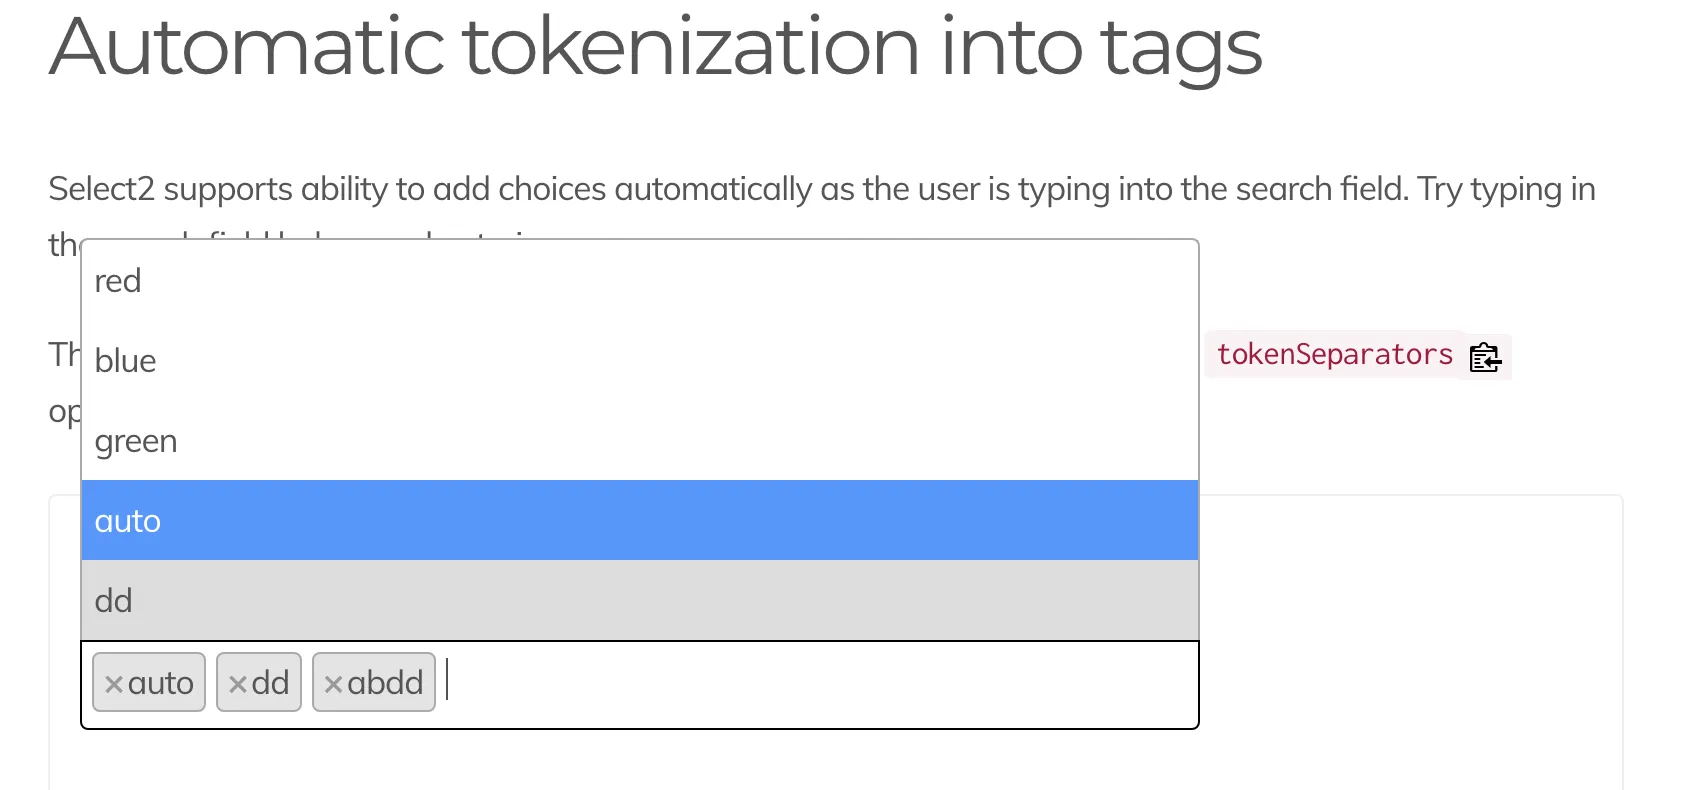
我們希望 ui 可以實現的樣式是類似像 Automatic tokenization into tags 這樣子的:有存在的 tag 可以出現建議選單,不存在的也可以新增,並且可以在輸入匡中嵌入一些標籤的樣式
安裝 select 2
在 Gemfile 中新增 select2-rails ,記得儲存後執行 bundle install:
gem 'select2-rails', '~> 4.0', '>= 4.0.3'[Gemfile]
接著再 application.js 和 application.scss 中新增 select 2 。因為 select 2 是屬於 jQuery 的套件,記得引入 js 檔案順序在 jQuery 的後面:
//= require rails-ujs
//= require activestorage
//= require turbolinks
//= require jquery3
//= require popper
//= require select2
//= require bootstrap[application.js]
@import "bootstrap";
@import "font-awesome";
@import "select2";
@import "select2-bootstrap";[application.scss]
改用陣列來傳遞 tag
原本我們使用的 post.tag_list 是以字串來傳遞多標籤的內容,但如果我們改用 select 2 的選單作為輸入介面,在表單上會使用 <select> 來作為多重選項的輸入方式,在 rails controller 中就要改由使用陣列來接收這個表單輸入。
因此我們在 post.rb 中再新增一組新的 tag_item getter 和 setter,是以陣列的方式來接收標籤
class Post < ApplicationRecord
# ...
def tag_items
tags.map(&:name)
end
def tag_items=(names)
self.tags = names.map{|item|
Tag.where(name: item.strip).first_or_create! unless item.blank?}.compact!
end
end[post.rb]
接著修改 posts controller 中的 strong params
class PostsController < ApplicationController
# ...
def post_params
params.require(:post).permit(:title, :content, { tag_items: [] } )
end
end[postscontroller.rb]
在 view 中加入 select 2
最後一步,就是在 _form.html.erb 這個表單模板中修改 input 標籤,並且在下方使用 <script> 標籤來引入 select 2 函式庫。
<div class="row">
<div class="col-sm-8 offset-sm-2">
<%= simple_form_for post do |f| %>
<%= f.error_notification %>
<%= f.input :title %>
<%= f.input :content %>
<%= f.input :tag_items, as: :select, collection: Tag.order(:name), label_method: :name,value_method: :name, input_html: {multiple: true} %>
<%= f.button :submit ,class: "btn-outline-primary"%>
<% end %>
</div>
</div>
<script>
$(document).on('turbolinks:load', function () {
$("#post_tag_items").select2({
tags: true,
tokenSeparators: [',', ' ']
})
});
</script>[form.html.erb]
(貼心提醒:如果你的 rails 沒有關閉 turbolinks 功能,一定要使用 $(document).on('turbolinks:load', function(){}) 來包裹你的 JavaScript 程式碼,以免因為 turbolinks 的問題造成 js 執行有問題。)
[commit: use select 2 for tag input, modify post.rb for tag_items]
加上 select 2 的標籤輸入框如下:
完整程式碼可以參考我的 GitHub repo: taggit
參考資料